This page describes how to add a new Product Guide and how to maintain your existing Product Guides.
Table of Contents:
Overview
To add a new Product Guide to your Account, enter the "Product Guides" view (URL: https://workbench.excentos.com/MYACCOUNT#!product-guides). Click on the menu item "Product Guides" and choose "View all Product Guides". The view shows the Product Guides Overview table which includes all Product Guides of your account.
Adding a Product Guide
- At the bottom of the page, click on the "Add new Product Guide" button.
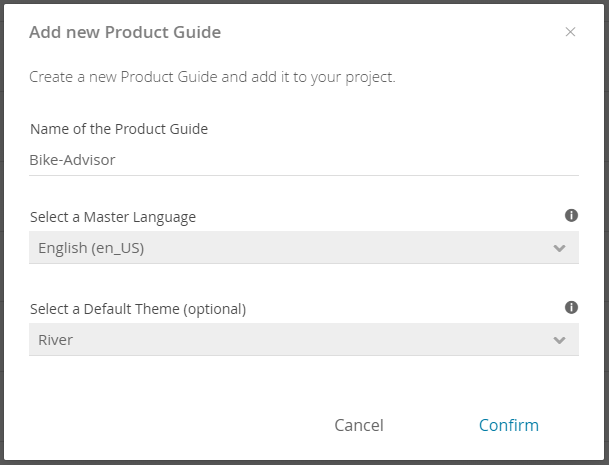
A modal window will open and request you to enter the Product Guide name.
The name may only consist of letters, numbers, underscores and dashes. The usage of spaces is not allowed.
- Select a master language. This language is interpreted as the main language of the advisor. Therefore you should select that one in which you will build your concept in the Concept Board.
- Furthermore you can optionally select a default theme for your new Product Guide. The selected theme will always be preselected in the advisor preview and publish view.
- Confirm the dialog to create the new Product Guide. Afterwards the "Product Guides Overview" table will show the new entry.
Product Guide Overview Table
This section describes the "Product Guide Overview" table and all its functionality in detail:


Beside the Product Guide name, each table row contains some meta information and action buttons. These elements are described below:
- Product Guide:
Contains the Product Guide name as a link. Click on this name to change the view to the corresponding Concept Board of the selected Product Guide (see Create the advisor concept). The '...' button opens a popup with additional navigation options. It allows you to go directly to the views Product Data (Integrate your product data), Concept Board, Recommendation (Recommendation View) and Publish (Publish and integrate your Product Guide). Market:
Describes the location/country for which the Product Guide is built. For example 'DE' is associated with Germany.Currently the market is preset to 'DE' and cannot be changed.
- Status:
Describes the current state of the Product Guide. Available states are:- Concept: Conceptual state which is set, if the Product Guide was never published.
- Live: Product Guide was published on "Service" or "Stage" at least once (see Publish and integrate your Product Guide).
- Created:
Contains the date of the initial Product Guide creation. - Last Modified:
Contains the date of the last modification within the corresponding Product Guide. Edit button (pencil icon):
This button opens a modal window to change some Product Guide settings, e.g. the Product Guide name. The input field only accepts the same characters as the Product Guide creation modal window.In order to propagate the change in the STAGE and SERVICE environments, the product guide has to be published in both.
Furthermore you can change the master language and the default theme settings.
- Copy button (two sheets of paper icon):
This button opens a modal window in which you can copy an existing Product Guide. Therefore, you have to enter the new Product Guide name. The input field only accepts the same characters as the Product Guide creation modal window. The name also must be different from the original Product Guide name. That is why a "_copy" string is appended per default. You can also specify a new master language. Confirming the dialog triggers the copy process. After that you can use the new Product Guide completely independent of the original Product Guide. Delete button (trash icon):
This button opens a modal window to confirm the deletion of the corresponding Product Guide. This button is visible by hovering over a specific table row on the right-hand side.This process cannot be reverted by yourself. Only the excentos support team can restore a deleted Product Guide.
- Filter Product Guide:
Entering text in this text field filters the Product Guide table. Only Product Guides with matching names are shown.
All these descriptions are also accessible via the info icon right next to the "Product Guide Overview" title.
What is next?
After adding a new Product Guide, there are two possible steps to continue:
a) Define the concept
or
b) Integrate the product data