...
To use the Product Guide
...
in your website or shop, you need to configure the
...
integration code and put it into your site. Following pages describe the possibilities and parameters in detail.
Children Display all true
Using JavaScript and HTML
This article describes the standard JavaScript integration. See Alternative Technologies for Site Integration if you want to check pros and cons of various integration technologies.
...
The integration code consists of two components:
...
...
| exclude | Read more.* |
|---|
Integration Code Configuration
Before you can use your integration code, please make sure that all configuration options are set correctly. These options are:
...
JavaScript loader code
The JavaScript code loads the excentos webservice and its business logic. It uses parameters that need to be set in your integration page.
HTML positioning
The HTML positioning defines at what position in your webpage the excentos JavaScript code will inject the application.
JavaScript code
| Code Block | ||||
|---|---|---|---|---|
| ||||
 <!-- begin excentos site integration code -->
 <script
    src="//environment/projectName/systemName/applicationName/locale/loadadvisor?theme=themeName">
 </script>
<!-- end excentos site integration code --> |
Example: //service.excentos.com/bikeshop/DE/bikeadvisor/de_DE/loadadvisor?theme=responsive
Parameters used by the integration page
excentos will provide you a separate document for your project-specific documentation of the parameter values used for your Product Guides. This general documentation only describes the meaning of the parameters and shows some general examples.
| PARAMETER | EXAMPLES | COMMENT |
|---|---|---|
| environment | service.excentos.com stage.excentos.com test.excentos.com | Describes the host name of the excentos webservice. service is used for "live production systems", and stage is used to test changes before being deployed live. You shall provide separate integration pages per environment; please see our documentation on the environments and how to use them to effectively test, integrate and operate the Product Guides. |
| projectName | bikeshop, jewellery_brand | Your project name that can be used across several systems and applications. |
| systemName | DE, UK, FR, B2B_FR | The system name defines a specific range of products and a specific configuration, often for one market or country. We typically use the country's ISO country in uppercase letters but it can be anything, even a brand name. Options that can be changed from one system to the others are e.g. product assortment, prices, recommendation behaviour, question flow, list of questions and answers displayed, content and images, general behaviour. A system can also be used to model B2B versus B2C applications based on the same core. |
| applicationName | app_bikeadvisor, app_runningshoes | Name of the Product Guide application. We always use lowercase letters. Including an "app" in the name allows more flexibility in the integration / JavaScript loader since we know that this depicts the application. |
| locale | de_DE, en_UK, de_CH, de_AT, fr_CH | The locale defines the language content displayed in the Product Guide. We typically use the ISO code (but can deviate from it if required). The locale can also be used to model different content for different target groups, e.g. a binocular Product Guide can use hunting-language and images for hunting fans and birding-language / images for bird observation gurus (and yes, these two target groups need to receive different buying arguments). |
| themeName | mobile, desktop, default, river, sunrise, earth | The theme defines the HTML/CSS style used by the Product Guide. Every application can use several themes (e.g. Bike Advisor long pager, Bike Advisor Wizard. One theme can be used across different applications (e.g. Bike Advisor and Jewellery Advisor use the same Wizard). A theme can also be used to distinguish between several brands or to style the user interface for channel partners differently. |
Where to insert the JavaScript code
Please insert this JavaScript code either in <HEAD> or <BODY>. If inserted in the <HEAD> (which is preferable), make sure it is inserted after the site's default scripting (esp. jquery.js). If you cannot place code in the html-<head> you may place the <head> code in the <body>, too. Integrating the script part at the end of the <head> instead of in the <body> leads to faster startup times of the Guides.
HTML code
The HTML code defines where the excentos JavaScript codewill inject the application within your page There is required HTML code (needed in any case), recommended code and optional code.
Required HTML code
This code is required to display the Product Guide:
| Code Block | ||||
|---|---|---|---|---|
| ||||
<!-- begin excentos content area -->
<div id="xc_application">
   <div id="xc_application_pane"></div>
   <div id="xc_loader"></div>
</div>
<!-- end excentos content area --> |
In most cases, you may place this HTML code at the same position as the JavaScript-Code if both are placed in the dody. There are rare cases of shops or websites that require the JavaScript code at another position than the HTML code (e.g. in the page footer, in a separate JavaScript block) and that's the only reason why we've separated HTML and JavaScript code.
Recommended HTML code
We highly recommend you adding this code to enhance the error handling. If the visitor has an incompatible browser, no JavaScript or if the excentos server is not available or in an error state, excentos automatically displays an error message to the user. If you want to prevent the case that excentos cannot even display the automatic error message, you can include the <div id="xc_fallback">. Please note that this happens in very rare cases only, especially if the user has JavaScript disabled or if the excentos server does not answer at all or not answer correctly. If you add the xc_fallback, please make sure you don't use relevant SEO keywords (e.g. avoid the name of your Product Guide and your product categories) – otherwise search engines might display the fallback content.
Example including all the required and recommended HTML code:
| Code Block | ||||
|---|---|---|---|---|
| ||||
<!-- begin excentos content area -->
<div id="xc_application">
  <div id="xc_application_pane"></div>
  <div id="xc_loader"></div>

  <!-- fallback message (RECOMMENDED) displayed if the excentos server cannot display its own error message.
       lease use generic terms and AVOID good SEO keywords because otherwise the error message might be displayed by search engines -->
  <div id="xc_fallback">
    <h2>Thanks for your interest in our search tools< /h2>
    <p>If you cannot start it please visit our <a href="/www.your-bikeshop.com/faceted-search">product search</a> or check whether your webbrowser has Javascript enabled.</p>
  </div>
</div>
<!-- end excentos content area --> |
Required Environments
excentos supports several Environments for effective development, testing and deployment procedures.
We require several Integration Pages to cover Stage and Service Environments for effective testing of changes within the Product Guide and / or your shop or website. Please read the documentation on Service and Stage Environments that also defines which Integration Pages for which Environments you need to provide.
User inputs
During one browser session users can always return to the Product Guide with all entries still active.
If a user exits the Product Guide to the shopping cart or to product detail pages and returns afterwards all his inputs and entries remain active. excentos saves the user profile and always will show the last rendered view to the returning user. The user make use of his entered data as long as he is in the same browser session.
Read more about Configure the Integration Code
...
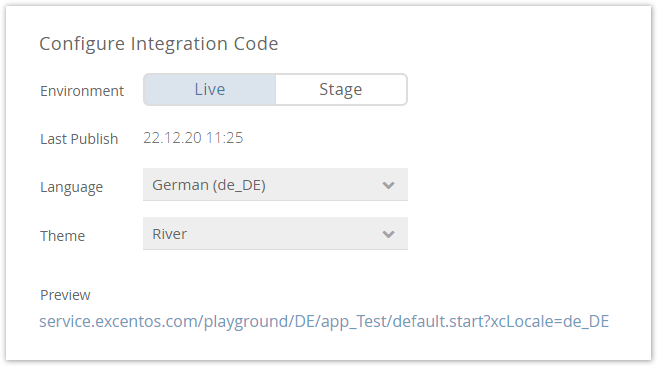
After changing a setting, the preview link and the integration code is automatically updated.
| Note | ||
|---|---|---|
| ||
Changing the Product Guide name does not change the URL in the "Stage" and "Live" environments on its own. That means that it is necessary to publish the Product Guide in both environments to complete the name change. |
Quick Steps for Integration
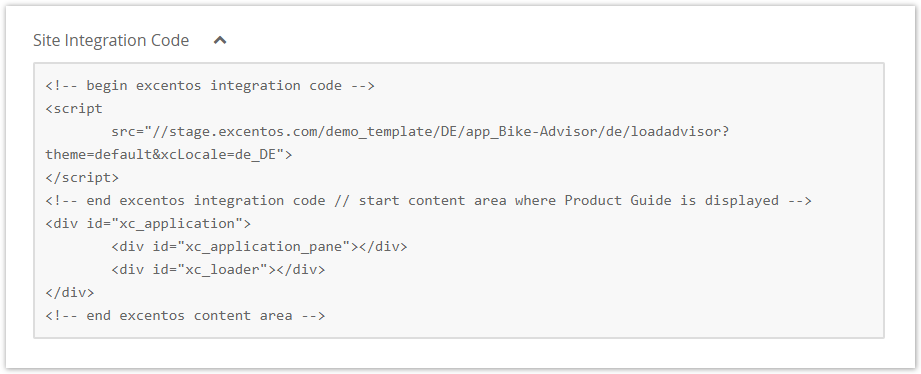
- Copy the site integration code (see image below) by either marking the text or clicking the "Copy Code" button.
- Create an empty page in your website.
- Paste the integration code into the integration page.
You may add more parameters to preset Answer Options or start on a different Stage as described in page Integration URL Parameters.
Full Documentation
There is a lot more to know about integrating your Product Guides effectively. You can tweak parameters, optimize for search engines (SEO) or use intro and fallback content. Please read our full site integration documentation for more details.
...


