Not every product data feed is 100% complete respectively contains all information the Product Guide needs. With the aid of the Attribute Creation it is possible to enhance your data feed without requesting an updated version from another company department. The original feed do not need to change at all. The following sections explain how a new attribute is created and which settings you can configure.
Table of Contents:
How to create a new attribute?
To create a new attribute you have to go to the AI Data Training section. This can be found in the navigation bar in the submenu of Product Data.

Initially the view only contains the button "Create Attribute". Clicking on it creates a text input field to enter the name of the new attribute.
For the attribute name only the following characters are
 Allowed: letters a-z, numbers 0-9, dashes "-" and underscores "_"
  Not permitted: all special characters (like $, &, Ü), white spaces and the name "null" which is reserved elsewhere.
After you entered an attribute name successfully you can add corresponding attribute values and/or edit configuration settings (see section below).
Attribute Column Structure
Once you entered an attribute name the created column contains three main elements:
- Attribute name component (blue)
- Add Value input field
- The subview button "Assign Values"
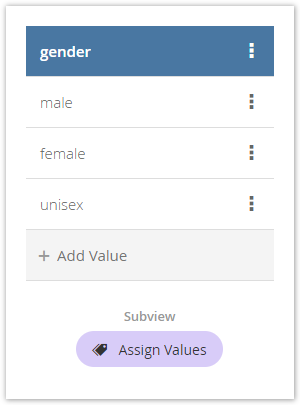
Attribute Name
The attribute name component includes the current attribute name as well as a menu (three dots "⋮") to edit some attribute configurations.
The configuration contains
- Ordered Values:
Checkbox to declare that the attribute values have an implicit order (e.g. for numeric values or clothing sizes). That can be relevant for the recommendation engine. - Multiple Values:
Checkbox to enable multiple value selection. With this feature enabled, it is possible to annotate several attribute values to a product (see Product Annotation for more information). - Rename:
Replaces the blue name label with a text input field. Within this input you can change the attribute name. Note that the same name constraints apply like in the attribute creation process.
 - Delete:
Removes the attribute irreversible.
Attribute Value
To add attribute values you have to use the "Add Value" input field. The names follow the same name constraint like the attribute name.
After entering the value name successfully an attribute value component is added to the attribute column. This includes the current value name and a menu button to edit the value configuration.
The configuration contains
- Default:
Enabling this checkbox sets this value as the default value of the attribute. That means that during the annotation process this value is preselected for each product. - Rename:
Replaces the name label with a text input field. Within this input you can change the attribute value name. - Delete:
Removes the attribute value irreversible from the attribute.
Assign Values
After you have added all values to the attribute and set all configurations correctly as wished, you can annotate or assign the products to the new attribute. Clicking on this button forwards you into the Annotation view. Read more about this view on the next page.